Server Edition Only
This article is applicable only to Validatar Server.
Getting Started on Windows
Overview
In this section, we'll review
Access required to complete the installation process
Web server and database server requirements
SMTP setup
Additional install options
Access & Credentials
In order to fulfill the prerequisites you must have:
Admin access to the web server
Admin access to create and manage the database Validatar will use on the back-end
In order to run the Validatar installer you must have:
Admin access to the web server
Validatar back-end database credentials on hand
Web Server Specifications
HDD: 50 GB (the web application files take up roughly 150 MB)
RAM: 4-16 GB
CPU: 2.0 GHz or faster (2-8 cores)
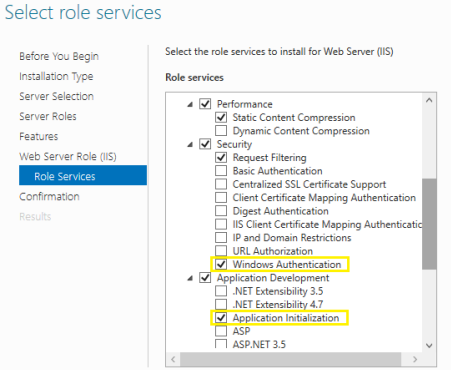
The server must have Internet Information Services (IIS) installed, including the following highlighted options:
To add and configure IIS:
Type Server Manager in the Windows search bar
Click Add Roles & Features
Also found under Manage in the top-right corner
Click Next for every page until you reach the Server Roles section
In Server Roles check Web Server (IIS) then Add Features
Click Next
In the Role Services section
Scroll down the web services list, expand Security, check Windows Authentication
Expand Application Development, check Application Initialization
Click Next, then Install
Install the following required tools if they are not already installed:
The web server must have the IIS URL Rewrite extension installed: download URL Rewrite here
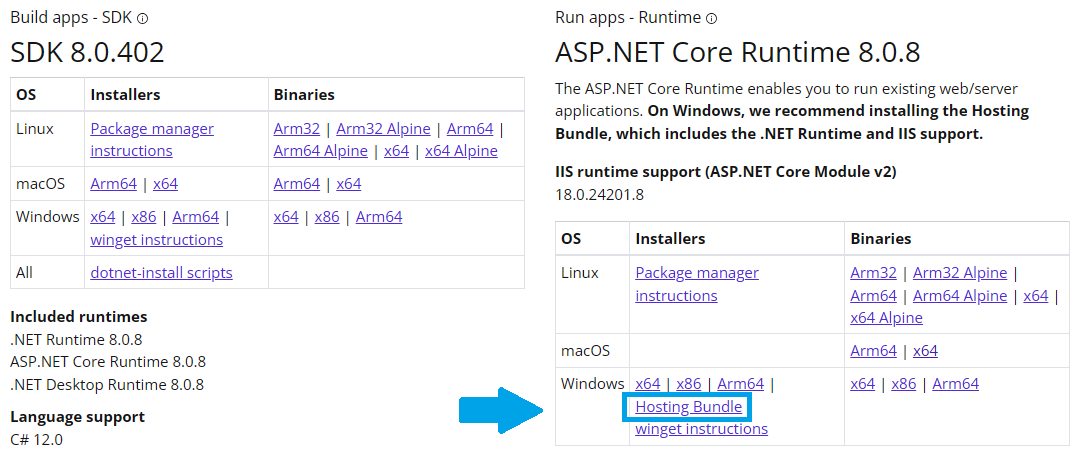
The web server must have the Hosting Bundle installed for ASP.NET Core Runtime 8.0.x: download .NET Core here

Be sure to select the Hosting Bundle option.
Database Server Specifications
The database server can either be SQL Server or PostgreSQL
Supported versions
SQL Server 2022 (no older than 2014)
PostgreSQL 14.1
SQL Server 2022 Express (no older than 2014) - only recommended for proof of concepts or trials
Common Specifications
HDD: 50 GB
SQL Drive: allocate 50 GB total for the Validatar metadata data/log files
RAM: 16 GB
CPU: 2.0 GHz or faster
Creating the Validatar Database (SQL Server)
Create a new database named "Validatar"
If you'd like to use a different name for the database, replace references to the "Validatar" database in the instructions below with the correct name.
When using Windows Authentication for database connections in Validatar:
Your IT team must create an Active Directory (AD) service account and provide the corresponding credentials.
Grant this domain account db_owner access to the Validatar database.
Use this domain account when configuring the Validatar application pool in IIS during the installation procedure.
When using SQL Server authentication for database connections in Validatar:
Create a SQL Server login
Grant this login db_owner access to the Validatar database
Creating the Validatar Database (PostgreSQL)
If the web server does not already have a PostgreSQL ODBC driver installed, download a driver from the following page: https://www.postgresql.org/ftp/odbc/releases. From that page, open the latest REL-#_#_# folder, then download the psqlodbc_x64.msi file and install it.
Create a new database named “validatar”
Create a new user role named “app_validatar” and grant appropriate permissions as shown in the script below, which should be run in a session in the “validatar” database.
CREATE USER app_validatar WITH PASSWORD '<password>';
GRANT CONNECT, TEMPORARY ON DATABASE validatar TO app_validatar;
GRANT ALL PRIVILEGES ON ALL TABLES IN SCHEMA public TO app_validatar;
SMTP Settings
Configure SMTP settings so that Validatar can send password reset and other notification emails. If the SMTP settings are unknown, check with your IT administrator or Network administrator for this information.
SMTP Warning
Failure to configure SMTP settings promptly after installation may result in potential issues such as being locked out of your Validatar account or not receiving critical notifications and reports from the platform.
Additional Options
Snowflake ODBC Driver: If you will be testing Snowflake data, download the driver here
Other ODBC Drivers: Install the appropriate drivers if you plan to connect to data via ODBC.
DNS Entry: You can create a DNS record for the Validatar website so that Validatar can be accessed with a user-friendly address instead of the web server name or IP Address.
SSL Certificate Obtain an SSL certificate from a certificate authority to encrypt network traffic to Validatar. After installing Validatar, use IIS to assign the SSL certificate to the Validatar website. Find detailed steps on how to assign the SSL certificate in the install guide.
Getting Started on Linux
To install Validatar on Linux, you will need to execute a script tailored to the variant of Linux you are utilizing. You can find the necessary scripts in the Linux Install Guide.