Overview
Validatar supports Single Sign-On (SSO) using Okta as the Identity Provider. The following steps show how to setup and configure Okta as an SSO Provider within Validatar.nCreate a new application
Within the Okta Developer dashboard, navigate to Applications, then click Create App Integration.
.png)
Select SAML 2.0 for the sign-in method and click Next. Currently, Validatar only supports SAML 2.0 as an SSO method.
.png)
Enter your App Name and click Next.
.png)
Open a separate browser tab and navigate to the Settings > Configuration > SSO Providers page in Validatar. Click Add Provider, then enter a name for the SSO provider. Copy the SSO Endpoint URL from Validatar into the Single sign on URL field in Okta.
For the Audience URI (SP Entity ID), enter a unique identifier (no spaces), which is typically formatted as a URL (i.e. https://sso-demo.validatar.com). Note that this does not have to be an actual URL. Copy this value to the SP Entity ID field in the Metadata section of the Validatar browser tab.
Select the Name ID format field. Validatar supports EmailAddress and Persistent formats. In this example, we’ll use EmailAddress.
The EmailAddress format maps the name identifier from Okta (as an email address) to the email address of a user in your Validatar instance. This will also populate the username with the email address.
The Persistent format maps the name identifier from Okta to the username of a Validatar user. When using a persistent format, Okta also needs to provide an attribute to be used for the email address of a user in Validatar, which should be entered into the Email Attribute Name field.
The following two flowcharts run through the process of authenticating with either EmailAddress or Persistent.
.png)
The Application username is passed as the identifier to Validatar. If the Name ID format is set to EmailAddress, choose an application username that corresponds to a valid email address.
.png)
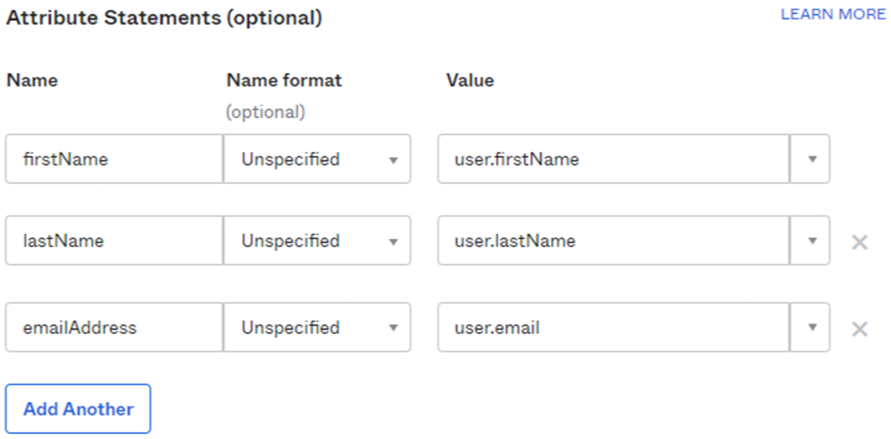
The next step is to configure Attribute Statements. When creating a new user through SSO, Validatar needs to know what to enter for a user’s first and last name. Also, if you’re using the Persistent Name ID format, you’ll need to provide an email address attribute.
Map the first and last name attributes like the following (and optionally email address):

Copy the same attribute names to the corresponding fields in Validatar.

Click Next on the Okta configuration, then Finish.
Finishing the configuration
On your app integration page in Okta, navigate to the Sign On tab, then click View SAML setup instructions.
.png)
Copy the fields from this page into the Validatar configuration.
Copy the Identity Provider Single Sign-On URL to the IDP Endpoint URL field in Validatar.
Copy the Identity Provider Issuer to the IDP Entity ID field.
Copy the X.509 Certificate into the IDP Certificate field.
Okta browser tab:
.png)
Validatar browser tab:
.png)
Once completed, select the Initial User Groups that should be assigned to auto-created users.
Click the Save button in Validatar to save your changes to the SSO Provider. At this point, you should be able to test the SSO configuration by logging out of Validatar and clicking the Sign in with SSO link at the bottom of the login page.