Overview
A Databricks data processing engine runs your data quality tests and profile sets directly inside your Databricks environment. Test datasets are compared within Databricks, results are stored in a Databricks catalog that you control, and only summary results are sent back to Validatar. Data that already lives in Databricks never leaves it, and data from other sources (such as on-premises SQL Server) is pushed into temporary tables in Databricks for comparison rather than being routed through another platform.
The Databricks engine was introduced in Validatar 2026.1. For a summary of what shipped, see the 2026.1 Release Notes.
Note: The Databricks data processing engine is a licensed feature. Contact your Validatar account representative if you don't see Databricks as an option when creating a new engine.
Setting up the engine takes four steps: prepare your Databricks workspace, configure the connection in Validatar, run the generated setup script, and validate the connection.
Prerequisites
Before you begin, make sure you have:
- Validatar 2026.1 or later with the Databricks data processing engine license enabled
- The Global Data Source Admin role in Validatar
- Databricks account admin access (or someone who has it) to create a service principal and grant workspace access
- A Databricks SQL warehouse for Validatar to use
- Permission to create catalogs in your Databricks metastore, for the one-time setup script
Step 1: Prepare Databricks
Validatar authenticates to Databricks using a service principal with OAuth machine-to-machine (M2M) credentials. Personal access tokens and Microsoft Entra ID authentication are not supported for data processing engines.
Tip: If you already have a service principal that Validatar uses to read data from Databricks, you can reuse it here. It just needs the additional permissions below, plus a client secret.
Create a service principal
- In your Databricks console, go to Account > User management and switch to the Service principals tab.
- Click Add service principal, enter a display name, and click Add service principal.
- Open the new service principal and switch to the Credentials & secrets tab.
- Click Generate secret, choose a lifetime, and click Generate.
- Copy the Client ID and Secret somewhere safe. You'll enter both in Validatar in Step 2.
Warning: When the secret expires, tests using this engine stop running until you generate a new secret and update the engine configuration in Validatar. Set a calendar reminder before the expiration date.
Grant workspace access
- Go to Account > Workspaces, open your workspace, and switch to the Permissions tab.
- Click Add permissions and search for the service principal. Verify that the Consumer access, Databricks SQL access, and Workspace access entitlement options are enabled, then click Add permissions.
Grant SQL warehouse access
- In your workspace, go to the SQL Warehouses page and open the warehouse Validatar will use.
- Click Permissions, search for the service principal, set the permission to Can use, and click Add.
Enable outbound network access
This step lets Databricks notify your Validatar cloud instance when a script finishes running. Without it, tests that compare Databricks data to other systems will fail.
- Log in to the Databricks console as the service principal.
- Click the profile icon at the top right and choose Previews.
- Find Enable networking for isolated workloads in serverless SQL warehouses and turn it on.
Note: This preview toggle is per-user, so it must be enabled for the service principal itself, not for your own account.
Step 2: Configure the Connection in Validatar
- In Validatar, go to Settings > Data Processing Engines and click New Engine.
- Enter a name for the engine and choose Databricks as the type.
- Complete the connection fields:
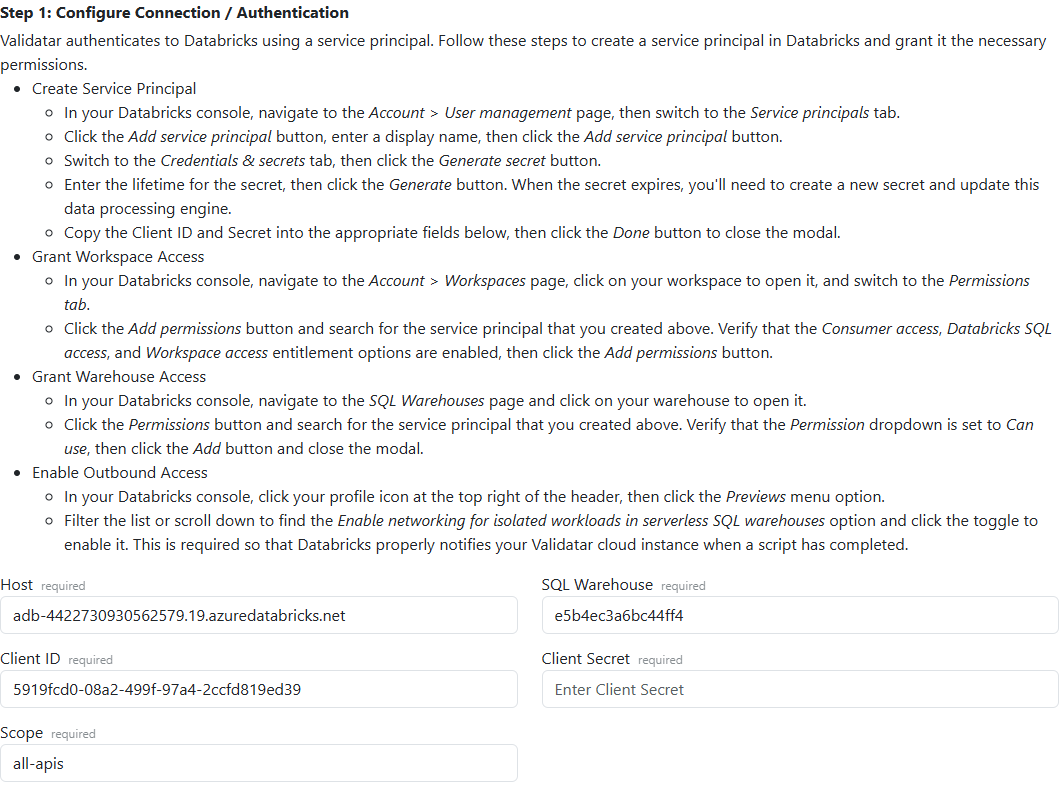
| Field | Value |
|---|---|
| Host | Your workspace hostname, e.g. adb-1234567890123456.7.azuredatabricks.net or dbc-a1b2c3d4-e5f6.cloud.databricks.com. No https:// prefix. |
| SQL Warehouse | The warehouse ID, not its name or HTTP path. Find it in the warehouse's Connection details tab, or in the last segment of the warehouse's URL. |
| Client ID | The service principal's client ID from Step 1. |
| Client Secret | The secret you generated in Step 1. |
| Scope | The OAuth scope for token requests. Use the default, all-apis, unless your Databricks administrator tells you otherwise. |
- In the Configure Databricks section, set the storage location:
| Field | Value |
|---|---|
| Database Name | The Unity Catalog catalog where results will be stored. Defaults to validatar. The setup script creates it if it doesn't exist. |
| Schema | The schema inside that catalog. Defaults to results. |
- Click Save.
Note: Server installations also show a Temporary File Folder field for staging files during processing. Cloud instances handle this automatically and don't show the field.
Step 3: Run the Setup Script
- Click Generate Setup Script. Validatar produces a script that creates the results catalog and schema and grants the service principal the privileges it needs on them.
- Copy the script into the Databricks SQL editor and run it as a user with permission to create catalogs in your metastore.
The script:
CREATE CATALOG IF NOT EXISTS `validatar`;
GRANT USE CATALOG, CREATE SCHEMA ON CATALOG `validatar` TO `<your-client-id>`;

CREATE SCHEMA IF NOT EXISTS `validatar`.`results`;
GRANT ALL PRIVILEGES ON SCHEMA `validatar`.`results` TO `<your-client-id>`;
The catalog and schema names reflect whatever you entered in Step 2.
Step 4: Validate the Connection
Click Validate Settings. Validatar runs through these checks in order:
- Verify that the Databricks host is reachable
- Verify authentication
- Verify the warehouse
- Verify the database and schema
- Create volume and tables
- Verify access to the temporary file folder
- Verify that a sample file can be uploaded/imported to Databricks
- Verify API integration (cloud instances)
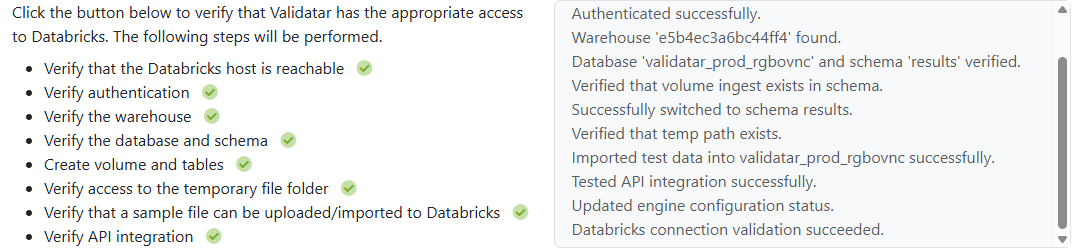
The "Create volume and tables" step creates the result tables and an ingest volume inside your results schema. That volume is where data from non-Databricks sources lands before being loaded into temporary tables for comparison.
The engine is ready once every check passes. If a check fails, the validation log on the right side of the page shows the specific error.
Assigning Data Sources to the Engine
Once the engine is validated, it appears as a connection type when you create or edit a data source:
- Create a new data source (or edit an existing one) and choose the Databricks Engine connection type.
- Select your new engine. The catalogs listed are the ones the service principal has been granted read access to, so grant it read-only access to each catalog you want to test.
- Any test that uses this data source now processes and stores its results in Databricks.
For an overview of all engine types, see Creating Data Processing Engines.
Warning: When you switch an existing data source to a different processing engine, detail-level results from past runs stay in the old engine's storage. Test pass/fail history carries forward, but the row-level detail for old executions is only viewable in the UI while the original engine remains configured and reachable. If you need uninterrupted detail history, duplicate the data source and its tests instead of switching in place.
Notes and Limitations
- Authentication is OAuth M2M only. The engine authenticates with a service principal client ID and secret. Personal access tokens and Entra ID are not supported.
- Data agents need network access to Databricks. Tests that compare data from agent-connected sources (such as on-premises SQL Server) against Databricks push that data into Databricks temp tables, so the agent host must be able to reach your Databricks workspace. If the agent already runs Databricks queries today, this is already in place.
- Python data source scripts are not supported on data sources assigned to a Databricks engine. Test scripts must be SQL.
- Repository replication can target the Databricks engine, which makes Validatar's report datasets queryable in your results catalog. See Replication of Your Metadata to a Data Processing Engine and the Data Processing Engine Schema Overview.