Overview
This article walks through how to create and configure test actions on a standard test. You will learn how to add triggers, attach steps to those triggers, and configure each of the six available step types.
For background on what test actions are and how they work, see What are Test Actions.
Accessing the Actions Tab
- Open a project and navigate to the test you want to configure.
- Open the test configuration screen.
- Click the Actions tab.
The Actions tab displays all existing triggers and their steps. If no actions have been configured yet, you will see the message "No actions have been created yet."
Note: You must have Creator-level access to add or modify test actions.
Adding a Trigger
A trigger defines the condition under which action steps will execute. To add one:
- Click Add Action in the toolbar.
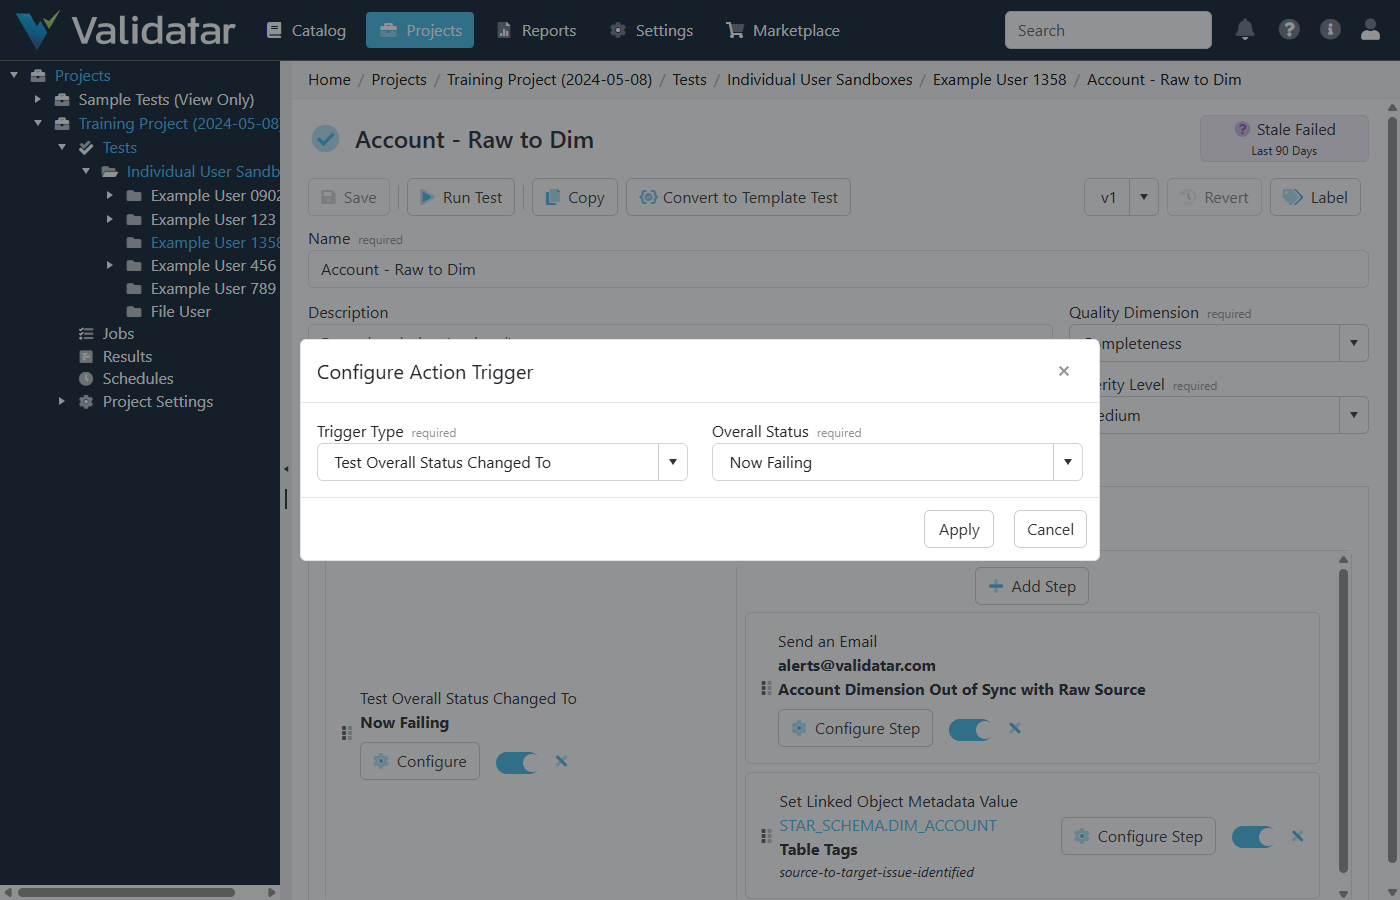
- In the Add Action Trigger dialog, select a Trigger Type from the dropdown.
- If the trigger type requires a condition, a second dropdown appears:
- Test Ran — no additional configuration needed. The trigger fires on every execution.
- Test Resulted In — select a Test Status: Passed, Failed, or Error.
- Test Overall Status Changed To — select an Overall Status (see the table below).
- Click Add Action to save the trigger.
Overall Status Options
| Status | Meaning |
|---|---|
| Consistent Passing | The test has been passing consistently across recent runs |
| Consistent Failing | The test has been failing consistently across recent runs |
| Consistent Erroring | The test has been erroring consistently across recent runs |
| Now Passing | The test just transitioned to a passing state |
| Now Failing | The test just transitioned to a failing state |
| Now Erroring | The test just transitioned to an erroring state |
| Intermittent Passing | The test is mostly passing but has occasional failures |
| Intermittent Failures | The test is experiencing intermittent failures |
| Intermittent Errors | The test is experiencing intermittent errors |
Tip: The "Test Overall Status Changed To" trigger only fires when the overall status actually changes as a result of the current execution. This makes it ideal for notifications that should not repeat on every run.
You can add multiple triggers to a single test, including multiple triggers of the same type with different conditions (e.g., one trigger for "Now Failing" and another for "Now Erroring").
Adding Steps to a Trigger
Once a trigger exists, you can add one or more steps to it:
- Click Add Step under the trigger you want to configure.
- In the Add Action Step dialog, select a Step Type from the dropdown.
- Configure the step according to its type (see below).
- Click Add Step to save.
Steps execute sequentially in the order they are listed. If a step fails, subsequent steps still execute.
Managing Triggers and Steps
Reordering
Both triggers and steps support drag-and-drop reordering. Grab the grip handle on the left side of a trigger or step and drag it to the desired position.
Enabling and Disabling
Each trigger and step has an enable/disable toggle. Disabling a trigger prevents all of its steps from executing. Disabling an individual step skips that step while still executing the others.
Editing
Click Configure on a trigger to change its type or condition. Click Configure Step on a step to modify its settings.
Deleting
Click the X icon on a trigger or step to remove it. You will be prompted to confirm the deletion.
Note: Remember to save the test after making changes to actions. Action changes are saved as part of the overall test configuration.
Configuring Each Step Type
Run a Standard Test
Triggers execution of another standard test in the same project. This is commonly used to run a detail-level test after a high-level test fails.
- Select Run a Standard Test as the step type.
- Begin typing the name of the target test in the search field.
- Select the test from the filtered results list. The full folder path and test name are displayed to help you identify the correct test.
The target test executes as a separate batch, independent of the parent test's batch context.
.png)
Run a Script
Executes a SQL or Python script against a data source connected to the project. The script editor supports autocomplete for template fields and helper references.
- Select Run a Script as the step type.
- Select a Data Source from the dropdown. The data sources available are those mapped to the current project. If only one data source is available, it is selected automatically.
- Write your script in the editor. The editor mode (SQL or Python) is determined by the data source's connection type.
Tip: You can use template fields in your script to inject test execution values at runtime. For example,
{{test_name}}resolves to the name of the test that triggered the action. See Using Template Fields in Test Actions for the full list.
Use the Preview button to execute the script in a dry-run mode and verify the output before saving. The preview shows execution messages, any output files, and the executed script with template fields resolved.
.png)
Run a Macro
Executes a pre-written macro from the data source template. Macros are parameterized scripts saved at the data engine level that accept input values for placeholder fields.
- Select Run a Macro as the step type.
- Select a Data Source from the dropdown.
- Select a Macro from the list of macros available on the selected data source's engine.
- Fill in the macro's parameters. Some parameters support metadata lookup — click on a parameter field to browse available schemas, tables, or columns depending on the parameter type.
Macro parameters use Handlebars syntax for placeholder resolution. The macro script itself is also processed through the test execution template fields, so dynamic values like {{result}} are available in the final executed script.
Use the Preview button to verify the macro execution before saving.
.png)
Send an Email
Sends an email notification to specified recipients. Requires SMTP to be configured. See SMTP Settings for setup.
- Select Send an Email as the step type.
- Enter Recipients as a comma- or semicolon-separated list of email addresses.
- Enter an Email Subject.
- Compose the Email Body using the rich text editor.
Template fields are supported in the subject and body fields (but not in the recipients field). Type { in the email body editor to trigger an autocomplete popup with available template fields and helper references.
.png)
Set Linked Object Metadata Value
Updates a custom field value on a metadata object (schema, table, or column) that is linked to the test's data sets.
Prerequisite: The test must have metadata links configured on its data sets. Only linked objects appear as options in this step.
- Select Set Linked Object Metadata Value as the step type.
- Select the Linked Object from the dropdown. If only one linked object exists, it is selected automatically.
- Select the Custom Field to update. Fields are grouped by section.
- Set the Value based on the field's data type:
- Text — enter a text value. Template fields are supported.
- Dropdown — select from the field's available options.
- Date — enter a date value.
- Tag List — select one or more tags and choose a bulk edit mode (see below).
- User/Group List — select one or more users or groups and choose a bulk edit mode.
- Optionally check Certify Value to protect the value from being overwritten by AI or other automated processes. Certified values require explicit confirmation before they can be changed via the UI.
.png)
Set Test Metadata Value
Updates a custom field value on the test itself. The configuration is similar to "Set Linked Object Metadata Value," but targets the test rather than a linked metadata object.
- Select Set Test Metadata Value as the step type.
- Select the Custom Field to update. Fields are grouped by section.
- Set the value using the same options described above (text, dropdown, date, tag list, or user/group list).
- Optionally check Certify Value.
.png)
Bulk Edit Modes for Multi-Value Fields
When working with Tag List or User/Group List fields in either metadata step, you must select a bulk edit mode that controls how the new value interacts with existing values:
| Mode | Behavior |
|---|---|
| Add to Existing | Appends the selected values to whatever is already set on the field |
| Replace All With | Removes all existing values and replaces them with the selected values |
| Find and Remove | Removes only the specified values from the field, leaving others intact |
| Clear Field | Removes all values from the field entirely |
Example: Run a Detail Test on Failure
A common pattern is to pair a fast, high-level row count test with a detailed comparison test:
- Create (or open) your high-level row count standard test.
- Go to the Actions tab.
- Click Add Action and select Test Resulted In with the condition Failed.
- Click Add Step under the new trigger.
- Select Run a Standard Test and search for your detail-level comparison test.
- Save the test.
Now, whenever the row count test fails, the detail comparison test runs automatically to surface the specific differences.
Example: Notify on Status Change
To send an email when a test transitions to a failing state:
- Open the test and go to the Actions tab.
- Click Add Action and select Test Overall Status Changed To with the condition Now Failing.
- Click Add Step and select Send an Email.
- Enter the recipients, subject, and body. Use template fields in the subject and body to include the test name and execution URL (see Using Template Fields in Test Actions).
- Save the test.
The email will only send when the test's overall status actually transitions to "Now Failing" — not on every failed execution.
What's Next
- Using Template Fields in Test Actions — how to use dynamic values like
{{test_name}},{{result}}, and{{execution_url}}in scripts, emails, and metadata values